

How to assign default Credential Provider in Windows 11/10
We all know that Windows 11/ten comes with multiple sign-in options available. This is possible due to the presence of various Credential Providers in the operating organization. In before versions of Windows such Windows XP, Windows Vista, etc., the password credential provider was the just option. Afterwards Windows 8, there were some new additions to the credential providers family – and at present we have many members in it.
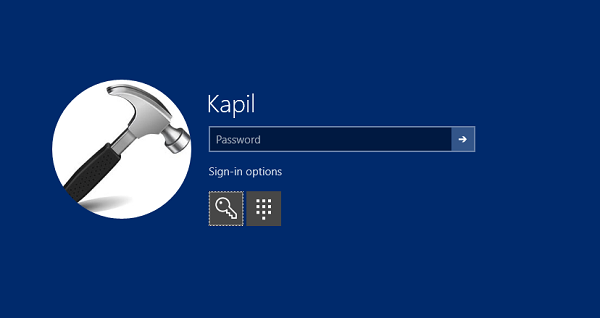
The above-shown screen illustrates the importance of credential providers. Here you can see at that place are two sign-in options available to the user. Now he tin can select either of them equally per his choice. If you minutely observe this login screen, you'll observe that Password sign-in icon is selected by default, when you would accept click Sign-in options link. This is because the countersign sign-in provider is actually the default credential provider here.
In this article, we'll show you how to assign a default credential provider to user accounts in Windows 11/10. Y'all may need to sign-in as an administrator to follow these steps.
Assign default Credential Provider in Windows 11/10
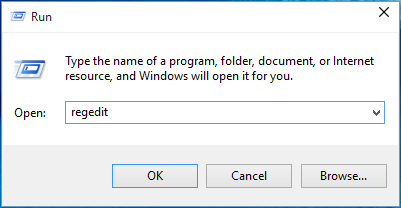
1. Press Windows Key + R combination, type regedit in Run dialog box and hit Enter to open the Registry Editor.
2. Navigate here:
HKEY_LOCAL_MACHINE\SOFTWARE\Microsoft\Windows\CurrentVersion\Authentication\Credential Providers
The list of registered credential providers and their GUIDs can exist found here.
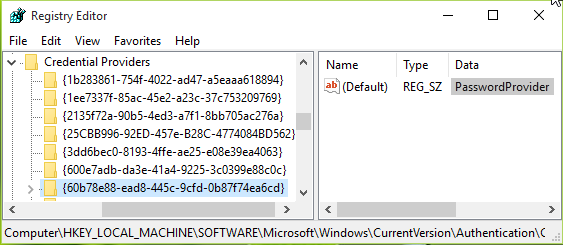
iii. In the to a higher place-shown window, expand the Credential Providers cardinal and yous'll run into some long-named sub-keys. These long sub-keys are with their name equally CLSID, corresponds to a specific credential provider. Yous've to highlight these sub-keys, one-by-one and in the corresponding right pane, check out the Data for (Default) registry string. This will help you lot to place which CLSID is for which provider. In this manner, option the default credential provider'south CLSID and annotation down it.
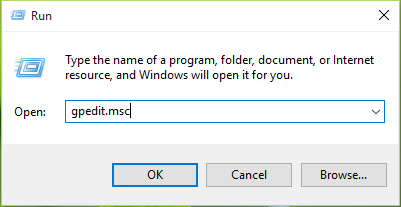
4. Now press Windows Key + R combination, type gpedit.msc in Run dialog box and hit Enter to open the Local Group Policy Editor.
five. In the Local Grouping Policy Editor window, become to:
Computer Configuration -> Administrative Templates -> System -> Logon

6. In the correct pane of the above-shown window, look for the policy setting named Assign a default credential provider. The policy is Not Configured past default. Double click on it to go this window:
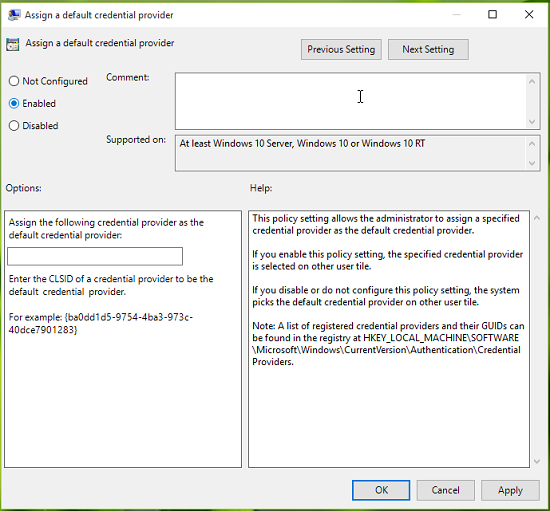
This policy setting allows the ambassador to assign a specified credential provider every bit the default credential provider. If yous enable this policy setting, the specified credential provider is selected on other user tile. If you lot disable or do non configure this policy setting, the arrangement picks the default credential provider on other user tile.
7. Finally, prepare the policy to Enabled land and in the Assign the following credential provider equally the default credential provider input box, type the CLSID we noted down in pace 3.
Click Utilise followed by OK. You tin can close the Group Policy Editor and reboot to make changes effective.
Promise you find the article useful!

Source: https://www.thewindowsclub.com/assign-default-credential-provider-windows-10
Posted by: farmerwithent.blogspot.com
0 Response to "How to assign default Credential Provider in Windows 11/10"
Post a Comment